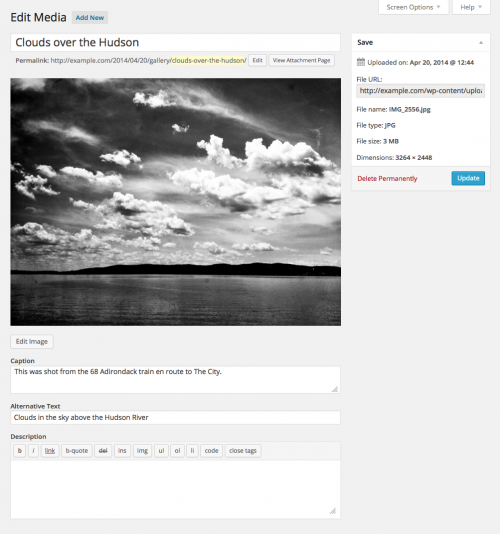
The Edit Media page is where you manage all of the information that is associated with your media. You can reach this page from the Media Library by clicking the Edit link next to the item you wish to edit. You can also reach this page by clicking on the Edit link when adding new media to your site, or when inserting media into your pages or posts.
In addition to managing information, there are also added controls for performing basic media edits, such as rotating, cropping, and resizing of images. For more information see the Edit Image section of this Codex page.
Edit Media Page
- Title
- Enter the Title of this Media. The Title will displayed in the File column of the Media Library Screen.
- Permalink
- This is the URL of the media attachment page. There is also a link to view the attachment page.
- Edit Image button
- (Image files only) allows you to make edits and perform simple actions to your images.
- Caption
- The caption for this Media. For image type Media, the Caption is also used as alternate text for that image.
- Alternate Text
- Enter the Alt text for the image, e.g. “The Mona Lisa” to describe the media.
- Description
- A description for this particular media.
- File URL
- Enter the physical location of the uploaded file.
- Save Meta Box
- Displays information about your media, such as the size, URL, and upload date. Also includes actions to Delete Permanently orUpdate any change you have made.
More Edit Media Options
Note: The following Meta Boxes may not be visible by default. You can enable them by clicking on the Screen Options tab at the top right of the Edit Mediapage.
- Discussion
- Controls the ability to leave comments and/or trackbacks and pingbacks on the media attachment page.
- Comments
- Displays current comments on the media attachment page.
- Slug
- Allows you to to edit the slug for attached items.
- Author
- Allows you to change the Author for attached items.
Developers: For more resources attachment editing, see this post.
Edit Image
Clicking on the Edit Image button launches the image editor sub-panel, giving you access to several useful image editing controls. The edits you make to your image are non-destructive and you can restore the image to it's original (uploaded) specifications at any time. Here are the various controls available to you in this Edit Image mode:
- Crop Icon
- By click directly on the image, and dragging while holding the left mouse button down, you can draw a selection box to the indicate the area you want to crop. You can use your cursor tograb the selection box to refine it's shape, as well as use keyboard shortcuts to fine-tune your crop selection. When you are ready, click on the Crop icon to finalize your image crop.
- Rotate Counter-Clockwise Icon
- Click the Rotate Counter-Clockwise icon to rotate the image counter-clockwise.
- Rotate clockwise Icon
- Click the Rotate Clockwise icon to rotate the image clockwise.
- Flip Vertically Icon
- Click the Flip Vertically icon to flip the image vertically.
- Flip Horizontially Icon
- Click the Flip Horizontially icon to flip the image horizontally.
- Un-do/Re-do Icons
- Click the Un-do icon to undo your last edit. Click the Re-do icon to restore your last edit. Note: You can click as many times as you want (in succession) to "step" through multiple history states.
- Scale Image
- Click the Scale Image button to proportionally scale the original image. For best results the scaling should be done before performing any other operations on it like crop, rotate, etc. Note that if you make the image larger it may become fuzzy. The original dimensions (e.g. 1024×768) are displayed and a box for the new dimensions is presented. After entering the new dimensions, click the Scale button.
- Image Crop
- Used in combination with the Crop Tool icon above (by first drawing your desired crop selection box) this tool allows you to make the following precise adjustments:
- Crop Aspect Ratio: You can specify the crop selection aspect ratio then hold down the Shift key while dragging to lock it. The values can be 1:1 (square), 4:3, 16:9, etc. If there is a selection, specifying aspect ratio will set it immediately.
- Crop Selection: Once started, the selection can be adjusted by entering new values (in pixels). Note that these values are scaled to approximately match the original image dimensions. The minimum selection size equals the thumbnail size as set in theSettings Media Screen.
- Restore Original Image
- If changes have been made to an image, the Restore Original Image button, when pressed, allows you to discard any changes and restore the original image. Previously edited copies of the image will not be deleted. Press the Restore image to complete the action.
- Save
- Use this to save the changes made to an image and return to the Edit Media screen for this image.
- Cancel
- Use this to cancel any operation that has been performed on the image.
Keyboard Shortcuts
When cropping your image, these keyboard combinations can 'fine-tune' the size of the crop frame. Note: The arrow key can be any of four arrow keys--up arrow, down arrow, left arrow, or right arrow:
- Arrow: move by 10px
- Shift + arrow: move by 1px
- Ctrl + arrow: resize by 10px
- Ctrl + Shift + arrow: resize by 1px
- Shift + drag: lock aspect ratio
Was this article helpful?
That’s Great!
Thank you for your feedback
Sorry! We couldn't be helpful
Thank you for your feedback
Feedback sent
We appreciate your effort and will try to fix the article


